
Last updated November 17, 2026
DIY vs Professional Spray Foam Insulation: What’s Safe to Do Yourself
A two-component DIY foam kit from a home center costs roughly $400 and covers about 200 board feet. A professional crew running a proportioner rig coats the same area for less per board foot at scale. The cost gap is real, but smaller than it looks. The gap in consequences when something goes wrong is not.
That asymmetry is what this guide is about. Most articles frame the DIY-versus-professional question as a price comparison, which turns it into an argument you can lose twice. The better frame is risk stratification: some spray foam applications have failure modes you can see and fix, and some bury the failure inside a wall or an attic where nobody catches it until the house is under contract. We’ve walked through both outcomes in Henderson, and the pattern is consistent. Here’s how to sort the jobs that are genuinely safe to do yourself from the ones that quietly transfer risk onto your title.
Quick Answer
DIY two-part spray foam is appropriate for small air-sealing jobs: rim joist sections under 50 square feet, pipe and wire penetrations, and isolated gaps where you can see both sides of the surface. Professional application is the safer call for unvented attic assemblies, crawl space ceilings, any closed-cell foam requiring an ignition or thermal barrier, and any area where you can’t verify the mix ratio by looking. The dividing line isn’t skill. It’s whether a failure would be visible and repairable, or hidden and expensive.
Table of Contents

- The Right Question to Ask Before You Buy a Kit
- Where DIY Spray Foam Is Genuinely Appropriate
- Where DIY Creates Unrecoverable Problems
- The Off-Ratio Failure: Invisible, Undetectable, Expensive
- Licensed Applicator Certification and Voided Warranties
- Nevada Code: Ignition Barriers and the Home Sale Inspection
- Real Cost Comparison: Per Board Foot in Henderson
- Common Mistakes to Avoid
The Right Question to Ask Before You Buy a Kit
Every spring in Henderson, we get calls from homeowners who foamed their own rim joists the previous fall and now can’t explain a cold spot on the floor above. Sometimes it’s an off-ratio batch. Sometimes it’s foam applied to a wet surface, or a gap left at the top plate because the can’s fan spray didn’t reach a corner. The point isn’t that DIY foam always fails. It’s that the failures cluster in specific locations, and those locations are predictable before you buy anything.
Sort your job into one of two categories before you spend a dollar:
- Recoverable failure: if the foam is wrong, you can see it, cut it out, and redo it without opening a finished surface. Penetration seals, exposed rim joist bays, gaps around a dryer vent.
- Unrecoverable failure: if the foam is wrong, you won’t know for years, and correcting it means removing drywall, ceiling, or flooring. Underside of a subfloor. Ceiling of an encapsulated crawl space. Any unvented attic deck.
Recoverable jobs are where a kit earns its cost. Unrecoverable jobs are where the price of a kit stops being relevant and the conversation shifts to documentation: mix ratio records, density tests, and a written warranty. That’s the standard we hold every spray foam insulation in Henderson project to, and it’s the standard you should ask any applicator to meet regardless of who does the work.
Where DIY Spray Foam Is Genuinely Appropriate
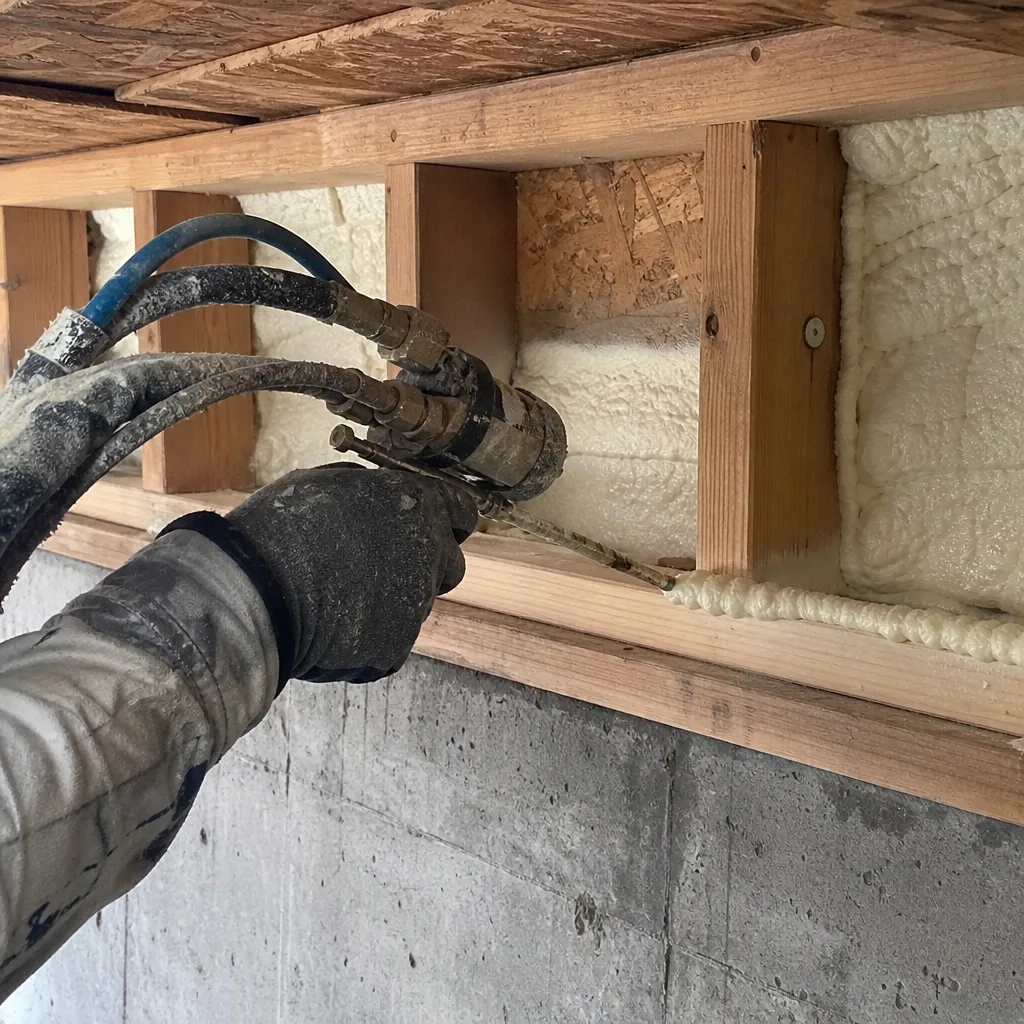
The market for two-part kits (the reusable-gun cans and the small tank sets) has improved substantially. A careful homeowner with a respirator, gloves, and a clean surface can produce a serviceable seal in the right places. Here’s the honest shortlist, sized to what a kit realistically covers without a proportioner:
- Rim joist sections under 50 square feet. The band of wood where your floor frame meets the foundation. One bay at a time, one kit, done in an afternoon. Works well in Henderson homes with exposed crawl space rim joists.
- Pipe, wire, and duct penetrations. Any hole in a top plate or exterior wall where something passes through. This is the single highest-value DIY foam use and where kits shine.
- Isolated air-sealing voids. Gaps behind a recessed light can (if the fixture is rated for contact), around a bath fan boot, under a shower valve opening.
Product properties to look for on the can or tank label:
- Closed-cell rated for the environment (rim joists and any unconditioned exposure) versus open-cell for interior-only gaps.
- Class A fire rating on the cured foam, which matters even for small applications.
- Explicit coverage in board feet at a stated thickness, not “covers up to X.” A kit that quotes 200 board feet at 1 inch doesn’t quote 200 board feet at 2 inches.
- A cure time in hours, not days, and a stated minimum surface and ambient temperature. Henderson summers are brutal on cure times; a can sitting in a 130°F garage will behave badly.
If your job is on that list, DIY is defensible. If it’s not, keep reading.
Where DIY Creates Unrecoverable Problems
These are the applications where we would never recommend a homeowner take on the work, not because they lack skill but because the failure is hidden and the repair is destructive.
- Unvented attic assemblies. Sealing the underside of your roof deck turns the attic into conditioned space. That means the foam must meet a target R-value across the whole assembly, seal every top plate and can light, and control moisture. Miss the top plate seal and you’ve insulated over an air leak, which is backwards. Miss the roof deck thickness by half an inch in one bay and you get a condensation point in the wrong place. Correcting it means cutting out the foam. This is exactly the failure the attic insulation in Henderson page is written to prevent.
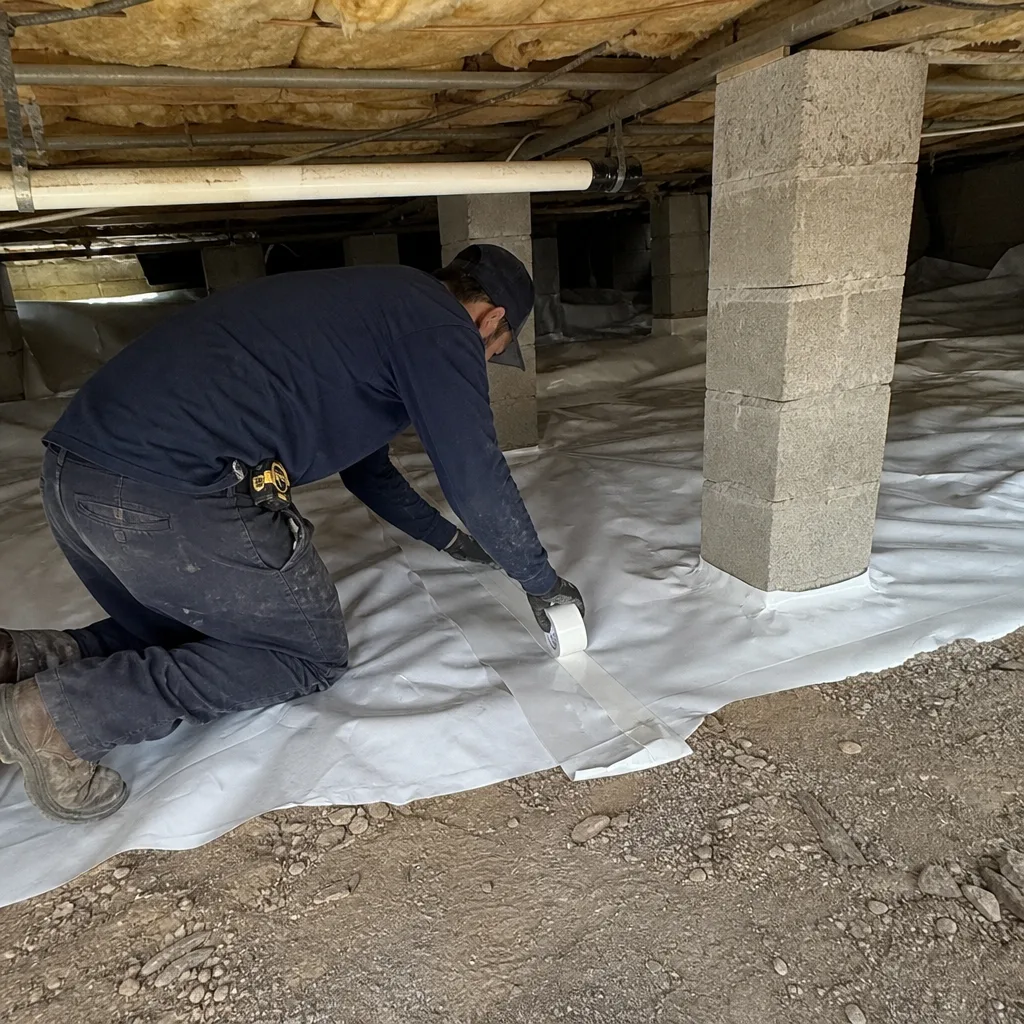
- Crawl space ceiling coverage. Foaming the underside of the floor joists in a vented crawl space requires a continuous, sealed layer. A cold spot left bare in a Henderson crawl space becomes a condensation surface in summer, and you won’t see the wet subfloor until a rim joist softens. Our crawl space encapsulation and vapor barrier service in Henderson treats the crawl space ceiling as a single sealed plane for exactly this reason.
- Any application requiring a thermal or ignition barrier. This is the biggest one, and it’s covered separately below.
- Wall cavities in a finished home. Retrofit wall foam requires injection ports and precise ratio control. There is no way to inspect the result visually. If it’s wrong, you learn about it when the foam shrinks or sags, and by then a wall is open anyway.
The rule of thumb: if you can’t see the finished surface from inside the same bay, DIY is the wrong tool. Every sentence in that list comes from jobs we’ve had to correct, and in Henderson the correction is always more expensive than the original application would have been.
The Off-Ratio Failure: Invisible, Undetectable, Expensive

Two-component polyurethane foam works because the A side (isocyanate) and the B side (polyol resin) cure together at a precise ratio, typically 1:1 in a kit and closer to 1:1.1 by weight in a proportioner rig. When the ratio drifts, the full cure never happens. The foam that comes out looks like foam. It’s the same color, the same texture, and it expands the same way. It just doesn’t develop the strength, the R-value, or the closed-cell structure it’s supposed to have.
We’re describing this as a technician’s problem, not a homeowner’s project. The reason is simple: off-ratio foam is nearly impossible to detect visually and impossible to detect by touch. It fails a density test. That’s it. A sample taken from the cured foam and weighed against the product’s stated density is the only reliable check.
Proportioners have a ratio monitor and a shot log. A two-part kit does not. What happens in a kit is that the A side runs hotter or colder than the B side depending on cartridge temperature, and a homeowner working in a hot Henderson garage gets a skewed mix with no way to know. The foam expands, cures to a skin, and holds up until it doesn’t. If that foam is the underside of an attic roof deck or a crawl space ceiling, the fix is removal and replacement, and the cost of a kit ($400) is dwarfed by the cost of correcting it. This is why whole-home envelope work in Henderson starts with a blower-door baseline: a 4,200 CFM50 reading before and a 2,100 after tells you the assembly sealed, not just that foam was sprayed.
Licensed Applicator Certification and Voided Warranties
Most closed-cell foam manufacturers tied to the brands we work with, including Icynene, Demilec, and CertainTeed, require the installer to hold a manufacturer appliator training or a licensed applicator certification for the warranty to be valid. That warranty language carries over to the distributed product sold in kits and cans: the material warranty follows the applicator, and if the applicator is the homeowner, the warranty runs to the homeowner. Which means when the foam fails, the homeowner is both the claim and the reviewer of the claim.
In practice, this transfers all risk. If a certified crew installs a Demilec product and it doesn’t perform, the manufacturer and the applicator’s warranty sit behind it, and the customer has a written record to point at. If a homeowner installs the same chemistry from a can, the recovery path is a conversation with the home center.
What to ask before anyone sprays foam in your home, DIY or not:
- Which specific product is being installed, by name and brand?
- Does the manufacturer require a certified applicator for the warranty to apply?
- What written warranty accompanies this application, and who issues it?
- Are density or mix-ratio records available for this job?
Under The Haven Standard, we hold to a parallel rule: a Written Price Before Any Work Starts and a written scope and written warranty delivered before anyone lifts a tool. The certification question is the same principle applied to the material itself.
Nevada Code: Ignition Barriers and the Home Sale Inspection

Nevada follows the same model codes most of the country uses, and the model code is not ambiguous on this point: spray foam installed in an occupied space (an attic used for storage, a crawl space you can enter, a wall in a finished room) generally requires a thermal barrier over the foam, or in limited assemblies an ignition barrier. A thermal barrier is typically ½-inch drywall; an ignition barrier is a thinner approved coating or listed material. The exception is where the foam is left exposed in an unoccupied, non-accessible space meeting specific code conditions, and that exception is narrower than most homeowners assume.
Here’s what happens in a Henderson home sale. The buyer’s inspector notes exposed spray foam in the attic or on the crawl space ceiling. The appraiser’s report may flag it. Whether or not the local AHJ (authority having jurisdiction) ever inspected the original work, the buyer’s lender wants the barrier covered before closing, because the missing barrier is a fire-spread concern on paper even if the house has never had a problem. That means drywall or coating installation, and in a crawl space with limited working height, that installation is expensive and awkward. We’ve seen closings delayed for weeks over this. In a 2019 custom home off Horizon Ridge, the barrier work alone ran into four figures and required returning a crew to a crawl space they could barely stand in.
If you foam an attic or a crawl space yourself and skip the barrier, you haven’t saved the cost. You’ve deferred it, with interest, to the transaction that will eventually expose it.
Real Cost Comparison: Per Board Foot in Henderson
Home center two-part kit pricing in the Henderson and Las Vegas market runs roughly $1.80 to $2.20 per board foot at 1 inch when you buy the mid-size tank sets. Professional closed-cell runs in a Henderson attic or crawl space typically fall between $1.40 and $2.00 per board foot depending on thickness, access, and volume, and open-cell in an attic assembly usually lands lower. A blower-door test with before-and-after readings, a written scope, and a warranty add to the professional number. Kit pricing almost never includes any of those.
The board-foot math is close enough that a homeowner comparing raw numbers could reasonably conclude DIY is cheaper. The math that actually matters is the cost of correcting a wrong installation, which in an unvented attic or a crawl space ceiling starts at removal and replaces the entire job. For a realistic per-project view, the pricing on our Henderson spray foam service page reflects what a job of your size runs, including the air sealing and blower-door documentation. That’s the number to compare a DIY kit against, not the sticker price alone.
Our technicians have up to 10 years of experience across residential envelope work, and the pattern we see is that the customers who save money on spray foam are the ones who scoped it correctly, not the ones who found the cheapest application method. A free second opinion on anyone’s written estimate, including a competing contractor’s, is available to make that scoping easier. Bring the quote, and we’ll read it with you.
Common Mistakes to Avoid

- Foaming over gaps you haven’t sealed first. Spray foam is not an air barrier substitute; it’s an air barrier when installed correctly and a moisture trap when it isn’t. Seal, then foam.
- Spraying a top plate from below without checking the bay above. In Henderson’s slab-on-grade and raised-floor homes alike, the top plate gap that matters is the one you can’t see from inside the room. Foam applied from the bottom seals nothing.
- Leaving foam exposed in a crawl space ceiling and assuming the inspector won’t care. The next buyer’s inspector will care. The missing ignition barrier is a documentation issue, not a visual one.
- Foaming to a wet or dusty surface. Henderson’s dust load and monsoon-season crawl space moisture both defeat adhesion. A weak bond fails silently, and the foam can delaminate within a year.
- Trusting a kit can at a cool or hot temperature. The can’s ratio drifts with cartridge temperature, and both extremes in the desert push it out of spec. Cool your cans, and don’t trust the spray pattern as a proxy for the mix.
- Doing the ceiling of an encapsulated crawl space yourself. If the assembly needs a moisture barrier and a sealed ceiling, the entire plane has to be one continuous piece. A homeowner spraying in sections leaves joints that leak.
- Skipping the before-and-after blower-door reading. Without a CFM50 measurement, nobody has any way to know what the foam actually changed. “It feels tighter” is not a measurement.
When to Call a Professional
Call for anything in an unvented attic, any crawl space ceiling coverage, any application requiring a thermal or ignition barrier, any wall injection, and any job where the foam will be visible only from inside a sealed assembly. Those are the cases where the cost of an off-ratio or moisture-trapped job outruns the cost of professional application by a wide margin. Also call if you’re preparing to sell, because the eventual buyer’s inspection will ask the exact questions this guide has walked through.
Envelope Insulation Henderson offers free estimates in Henderson, and we’ll tell you plainly when the job is one to handle yourself. Call (844) 320-5338 for an estimate, or to have us read a competing written quote with you. A live person answers, around the clock, and there’s no voicemail loop between you and a real answer.
Frequently Asked Questions
Yes, in most cases. Rim joist sections under 50 square feet, sprayed with a closed-cell two-part kit on a clean, dry surface, are one of the few applications where DIY is genuinely appropriate. Just check the can’s ambient temperature rating first, because a Henderson garage in July will push the cartridge out of spec.
On the sticker price, slightly, but the gap is smaller than most homeowners expect. Professional closed-cell in Henderson runs roughly $1.40 to $2.00 per board foot, and kits run $1.80 to $2.20 per board foot at 1 inch without any documentation, density records, or warranty. Once you factor in the cost of correcting a wrong application, the professional number often wins. Call (844) 320-5338 for an exact quote on your job. Estimates are free.
An off-ratio mix is when the A (isocyanate) and B (resin) sides of a two-component foam combine at the wrong proportion, so the foam never develops its full density, strength, or R-value. You can’t detect it visually or by touch, and the only reliable check is a density test on a cured sample. That’s why unvented attic and crawl space applications shouldn’t be done with a kit that has no ratio monitoring.
In most occupied-space applications, yes. Spray foam in an accessible attic or crawl space in Nevada generally needs either a thermal barrier (typically ½-inch drywall) or an approved ignition barrier over it, unless the space meets the narrower code exception for unoccupied, non-accessible areas. A buyer’s inspection during a Henderson home sale will flag an uncovered application, and barrier work after the fact is far more expensive than including it in the original install.
For most closed-cell brands, yes, unless the installer holds the manufacturer’s applicator certification. Icynene, Demilec, and CertainTeed products typically tie material warranties to a certified applicator, so a homeowner-installed application generally has no material warranty behind it. That transfers all risk to the homeowner if the foam underperforms.
The only reliable proof is a before-and-after blower-door test: a pressurization reading that shows, in a single number, how much air the building envelope was losing before the job and how much it’s losing after. A reading of 4,200 CFM50 before sealing and 2,100 after is a documented result. A homeowner spraying foam in a defined area can order a standalone blower-door test from an auditor, and it’s worth the cost if you’re doing the work yourself. On every one of our applicable jobs, we publish those readings so the homeowner can see the performance change they actually paid for.
The Bottom Line
The DIY spray foam decision is a risk-stratification problem, not a price comparison. Recoverable applications (rim joists, penetrations, exposed gaps) are genuinely safe to handle yourself, and we’ll say so. Unrecoverable ones (unvented attics, crawl space ceilings, anything needing an ignition barrier) are where the off-ratio failure and the voided warranty quietly pile up, and where a Henderson home sale or a moisture problem eventually surfaces the cost. Seal first, then insulate, and prove the result with a blower-door number. The rest is a kit-versus-proportioner argument you don’t need to win.
Every job Envelope Insulation Henderson completes begins with a Written Price Before Any Work Starts and ends with a Documented Photo Record, and whenever the work involves air sealing, we hand over the before-and-after blower-door readings. That’s the standard we operate under. If you’re unsure which category your job falls into, call (844) 320-5338 for a free estimate in Henderson and we’ll help you scope it before you buy anything.
Written by the team at Envelope Insulation Henderson.