
Last updated November 17, 2026
The Complete Crawl Space Encapsulation & Vapor Barrier Guide for Henderson Homeowners
Clark County averages about 4.2 inches of rain a year. And yet the crawl space under a Henderson home with an unencapsulated dirt floor can sit above 70% relative humidity all twelve months, quietly rotting the floor joists above it. Rain isn’t the variable that matters here. Soil vapor is. In Henderson, the ground itself holds moisture that gets pulled upward into the crawl space by the pressure difference between a conditioned house and the unconditioned void beneath it. This guide explains what actually stops that movement, what a proper encapsulation involves, and how to tell a real system from a sheet of plastic thrown over dirt. We’ll cover soils, air sealing, moisture readings, dehumidifiers, and the documentation you should expect before anyone starts work.
Quick Answer
Crawl space encapsulation in Henderson means sealing the crawl space from ground vapor and outside air with a reinforced liner (typically 20-mil, not 6-mil poly), sealing vents, rim joists, and penetrations, and controlling humidity year-round. A vapor barrier alone slows vapor; a true encapsulation system stops it from entering in the first place. The difference shows up in wood moisture content readings within weeks.
Table of Contents

- Vapor Retarder vs. True Encapsulation: What’s the Difference?
- Why Henderson’s Soils Change the Specification
- The Air-Sealing Sequence That Must Come First
- How a Liner Is Actually Installed
- What a Finished Job’s Documentation Package Includes
- When a Dehumidifier Is Necessary (and When It Isn’t)
- What Encapsulation Costs in Henderson
- Signs Your Henderson Crawl Space Needs Attention
Vapor Retarder vs. True Encapsulation: What’s the Difference?
A vapor retarder is a sheet of plastic, usually 6-mil polyethylene, laid over the dirt floor. A true encapsulation system is a reinforced liner, commonly 20-mil, mechanically fastened to the walls, sealed at every seam and penetration, and combined with air sealing so the crawl space becomes part of the conditioned envelope. They perform very differently under the same soil conditions.
Here’s why. A 6-mil sheet laid loosely over dirt has gaps at the edges, at piers, at plumbing penetrations, and at any place it wrinkles. Soil vapor finds those gaps and moves around the plastic rather than through it. The liner isn’t the failure point, the terminations are. On a typical Henderson crawl, that means vapor still reaches the joists even though the floor “looks covered.”
A 20-mil reinforced liner with sealed seams and a sealed wall termination closes those paths. The liner is fastened with mechanical terminations and taped or adhered at every lap. It’s a system, not a tarp.
- 6-mil poly: slows vapor, degrades with foot traffic, rarely sealed at edges, often DIY-installed and often reinstalled within a few years.
- 20-mil reinforced liner: resists punctures, sealed at seams and walls, typically paired with air sealing and vent closure, service life measured in decades.
- Typical Henderson installs: most homes in established neighborhoods like Green Valley and Anthem have crawl spaces sized for a full liner plus vent closure, not a partial sheet.
If you want the full service details for the Henderson market, our Crawl Space Encapsulation & Vapor Barrier in Henderson page walks through scope, materials, and pricing. We’ll also frequently recommend starting with an energy audit to establish a baseline before any liner goes down, because the audit numbers tell you what the encapsulation is actually fixing.
Why Henderson’s Soils Change the Specification

Henderson sits on a mix of caliche and clay layers that behave nothing like sandy soil. Caliche is a calcium-carbonate cemented layer that can cap soil below it and hold moisture in place. Clay expands and contracts with moisture content and manages vapor very differently from sand. Before anyone specifies liner thickness or installs a barrier, they should know what’s under the floor.
How to identify your soil type:
- Dig a small test hole in the crawl space: 12 to 18 inches down, and observe the material. Sandy soil crumbles; clay holds shape; caliche resists the shovel entirely.
- Look for moisture retention: caliche and clay hold moisture longer than sand. If the hole feels damp days after the last irrigation, you have a slowly releasing reservoir under the house.
- Check for surface cracking patterns: expansive clay shows polygonal cracking at the surface during dry spells. Those cracks widen vapor pathways during the wet season.
- Ask about the neighborhood history: older Henderson subdivisions near the foothills often hit caliche at shallower depths than valley-floor properties.
What we’ve seen in Henderson crawl spaces: caliche-capped soils hold moisture at the cap layer and push it laterally, which means a liner that isn’t sealed at the perimeter lets vapor travel sideways under the barrier and up around the foundation wall. That’s a specification issue, and it’s why a photo of a “covered” floor doesn’t tell you much. What matters is whether the system is sealed at the edges.
Soil type also affects whether the crawl should be vented or closed. On Henderson clay, we nearly always recommend a closed, sealed crawl with vent closure, because the outside air in summer is hot and humid relative to a cooler crawl interior, and open vents let that humid air condense on cool joists. The desert gets blamed for dryness, but the humidity differential is what actually drives condensation indoors.
The Air-Sealing Sequence That Must Come First
An airtight liner installed under open foundation vents moves moisture laterally under the barrier. Sealing the crawl space has to include sealing the vents, because the liner can’t do its job if outside air keeps entering and depositing vapor on the cool side of the plastic.
Air sealing is the prerequisite, not an add-on. In attic work we never blow insulation over an unsealed attic floor, and the same principle applies beneath the house: seal first, then install the vapor barrier and liner. Here’s the sequence we use in Henderson:
- Foundation vent closure: block each foundation vent with a rigid, sealed insert. Remove the screens or leave them in place as a backing; the point is a sealed assembly, not a screen.
- Rim joist sealing: the rim joist (the band of framing that sits between the foundation sill and the first floor) is one of the leakiest spots in any house. Seal the gaps at the sill plate, around the ends of joists, and at any penetrations.
- Penetration sealing: plumbing, electrical, gas, and HVAC lines that pass through the floor above, plus any foundation wall penetrations. Use materials rated for the substrate, not spray foam where a fire-rated assembly requires something else.
- Crawl access door: seal the hatch or access door with weatherstripping and a positive latch. A sealed crawl with a leaky hatch is still a vented crawl.
- Then install the liner over sealed ground, sealed walls, and sealed penetrations.
If the crawl shares framing with an attic above, the attic air sealing work often overlaps. We cover that in Attic Insulation in Henderson because the two systems work as one pressure boundary, and the blower-door number tells you whether the whole house is tighter after both are done.
For hard-to-reach rim areas and irregular foundation walls, spray foam is often the right material. A full look at that application lives on our Spray Foam Insulation in Henderson page. Materials we source include Icynene and Demelec spray foams, and CertainTeed liners and sealants, all selected for desert conditions and installed per manufacturer specification.
How a Liner Is Actually Installed

A 20-mil liner isn’t laid flat and tucked. It’s cut, fitted, fastened to the walls, and sealed at every seam. Here’s the typical install process:
- Prep the crawl: clear debris, remove old failing poly, address any rodent activity (the crawl access is often the entry point), and confirm wood moisture content readings on the joists before work begins.
- Pull the liner: cut the liner to size, position it with minimal seams, and run up the foundation walls to a sealed termination.
- Seal the seams: every lap gets taped or adhered with compatible sealant. Seam quality is where low-cost installs fail first.
- Fasten the wall terminations: mechanical fasteners hold the liner in place at the top of the wall; the top edge is then sealed so vapor can’t slip behind it.
- Seal penetrations: piers, plumbing, sump pits, and any interior supports get a sealed boot or collar.
- Test: relative humidity readings at multiple crawl locations, plus wood moisture content readings on joists and subfloor, taken after install and again at follow-up.
What you should insist on before signing anything: a liner spec sheet naming the manufacturer and the mil thickness, written warranty terms, and a documented photo record of the install. This is part of why our written price comes before any work starts and why every job closes with a documented photo record – so the homeowner has the paperwork even if they sell the house.
What a Finished Job’s Documentation Package Includes
A completed encapsulation job should hand you a package you can file. In Henderson, we provide:
- Pre-install relative humidity readings taken at multiple crawl locations (typically front, center, rear). These establish the baseline, and they’re the number we compare against afterward.
- Pre-install wood moisture content readings on joists and subfloor. Wood rot begins above roughly 19% moisture content; readings well above 20% before install tell you the crawl has a real moisture-control problem, not a cosmetic one.
- Post-install relative humidity readings taken at the same crawl locations after the liner is down and the dehumidifier (if any) has stabilized.
- Post-install wood moisture content readings on the same joists, so the before-and-after change is measurable.
- Liner spec sheet with the mil thickness, manufacturer, and installation date.
- Written warranty terms including the 365-Day Done Right Promise – if it’s not done right, we make it right.
- Documented photo record of the pre-condition, the sealed penetrations, the sealed wall terminations, and the finished crawl.
That package is what lets you compare bids honestly. Two installers can quote similar prices and install very different systems – one with a sealed 20-mil liner and sealed vents, one with a scrap of 6-mil and a promise. The paperwork is how you tell them apart before you pay.
When a Dehumidifier Is Necessary (and When It Isn’t)

A dehumidifier is a necessary system component when post-encapsulation relative humidity in the crawl space stays above 60% after the liner and air sealing are complete. Below 55%, it’s usually not required, and it’s often a sales add-on rather than a technical necessity. The determining number is the post-install humidity reading, not the installer’s preference.
Here’s how we decide in Henderson:
- Post-install RH under 55%: no dehumidifier required. Recheck at 30 days and again at 90.
- Post-install RH 55-60%: monitor. Some crawls stabilize lower after the liner’s first dry-out period.
- Post-install RH above 60%: a dehumidifier is justified. It’s the correct answer to a measured problem, not a default line item.
- Post-install RH above 70%: the encapsulation is not performing; re-inspect the vent sealing, the wall terminations, and any missed penetrations before installing mechanical dehumidification.
The other variable is occupancy. A home that’s tightly closed in summer with no ventilation and a crawl that shares air with living space will run higher humidity than one with a balanced HVAC system. If you want the full read on indoor air, a home energy audit is the right starting point, because it measures infiltration at the same time it maps moisture pathways.
If a contractor quotes a dehumidifier without first taking post-install readings, ask for the numbers. That’s the difference between a system and a sales conversation.
What Encapsulation Costs in Henderson
Most crawl space encapsulation jobs in Henderson run between $6,500 and $14,000 for a typical single-family crawl, with the price driven by square footage, liner thickness, the amount of air sealing required, and whether a dehumidifier is included. Partial vapor-retarder installs and repair work typically land lower, in the $2,000-$4,500 range.
- 6-mil vapor retarder, partial: $2,000-$3,500 typical
- 20-mil reinforced liner, sealed, standard crawl: $6,500-$11,000 typical
- Full system with dehumidifier and vent closure: $9,500-$14,000 typical
- Air sealing only (rim joists, vents, penetrations): $1,200-$3,000 typical
Those are real ranges for the Henderson market and they’re offered as a starting point for a written quote. Every home differs, and the honest way to price a job is to look at the crawl, take the moisture readings, and quote in writing before anyone lifts a tool – which is what our written price promise means in practice. If you have a competing estimate, we’ll read it with you as a free second opinion.
Signs Your Henderson Crawl Space Needs Attention
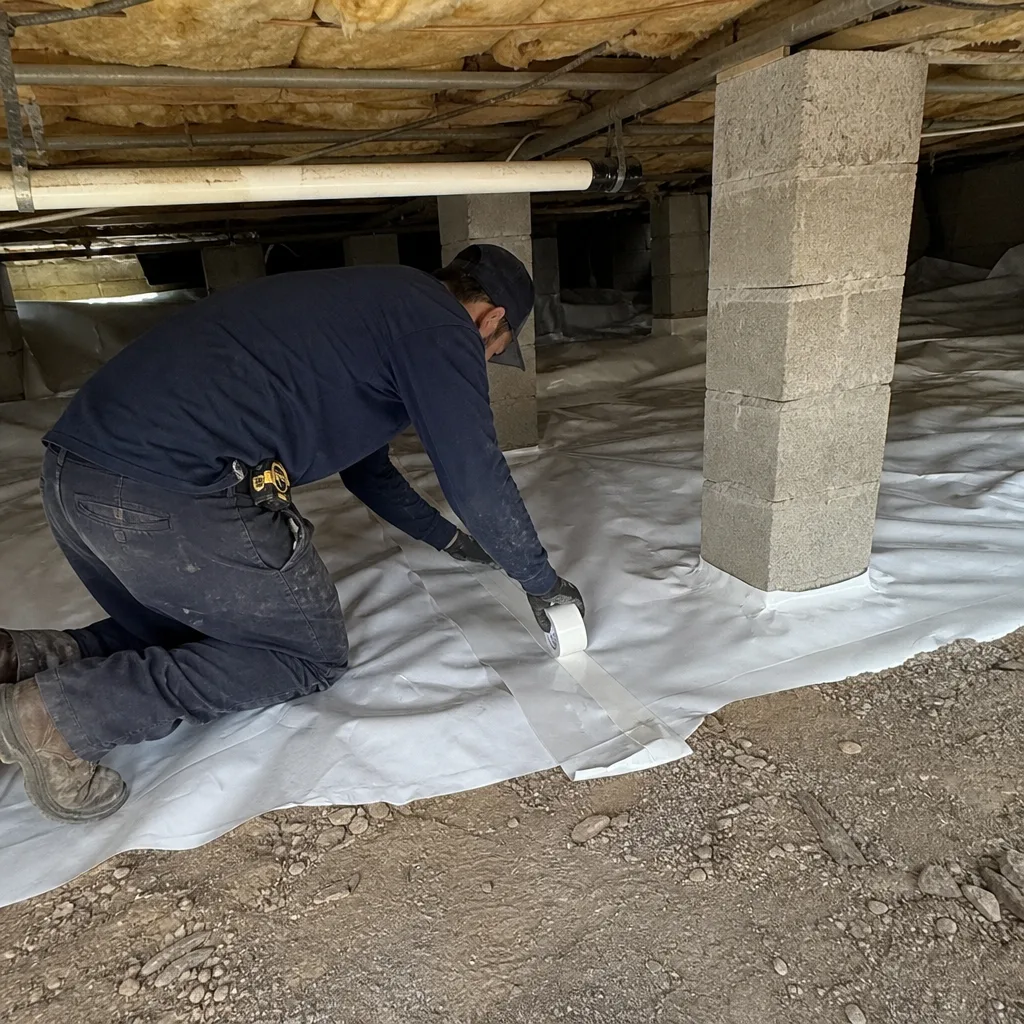
These are the signals we look for across Henderson crawl spaces, from older homes near downtown to newer builds in Inspirada and Cadence:
- Musty odor indoors, especially in first-floor rooms in summer, when vapor pressure is highest and the crawl is pulling soil air upward.
- Cupped or warped hardwood floors, a sign the subfloor is cycling between moisture and dryness underneath.
- Condensation on plumbing or ductwork under the floor, which usually means humid air is entering the crawl and hitting cool surfaces.
- Bowed or sagging floor joists, which can be a structural symptom of long-term wood moisture above the rot threshold.
- Visible water stains on the subfloor from below, a sign of summer condensation rather than plumbing leaks.
- Higher energy bills with no equipment change, a common effect of a crawl that’s pulling conditioned air downward.
If two or more of those apply, the crawl is the first place to look. It’s the one area of the house most Henderson homeowners never see, and it’s where the moisture problem usually lives.
Common Mistakes to Avoid
- Sealing the floor without sealing the vents. The liner can’t stop vapor that’s coming in through open foundation vents. Vent closure is where tight installs succeed or fail, and we see it missed often.
- Laying 6-mil poly and calling it encapsulated. A retarder slows vapor; a sealed 20-mil liner stops it. The price difference is real, but so is the performance difference two summers later.
- Skipping the wall terminations. Unsealed edges let vapor travel behind the liner and up the foundation wall. If the liner runs to the top of the wall but isn’t sealed there, the crawl is still vented from below.
- Ignoring soil type. Caliche and clay hold moisture longer than sand and push it laterally. A liner spec that works in a sandy-soil market may not be right in Henderson.
- Skipping the post-install humidity readings. Without before-and-after numbers, you have no way to verify the system is performing. This is the same reasoning behind publishing blower-door readings on attic work – the number is the evidence.
- Buying a dehumidifier without the reading that justifies it. Mechanical dehumidification is a technical answer to a measured humidity problem. If the reading under 60% doesn’t exist, the dehumidifier is a sales line item.
- Not getting the warranty in writing before work starts. A verbal warranty isn’t documentation. The written scope, the written price, and the written warranty should all be in your hands before anyone lifts a tool.
When to Call a Professional
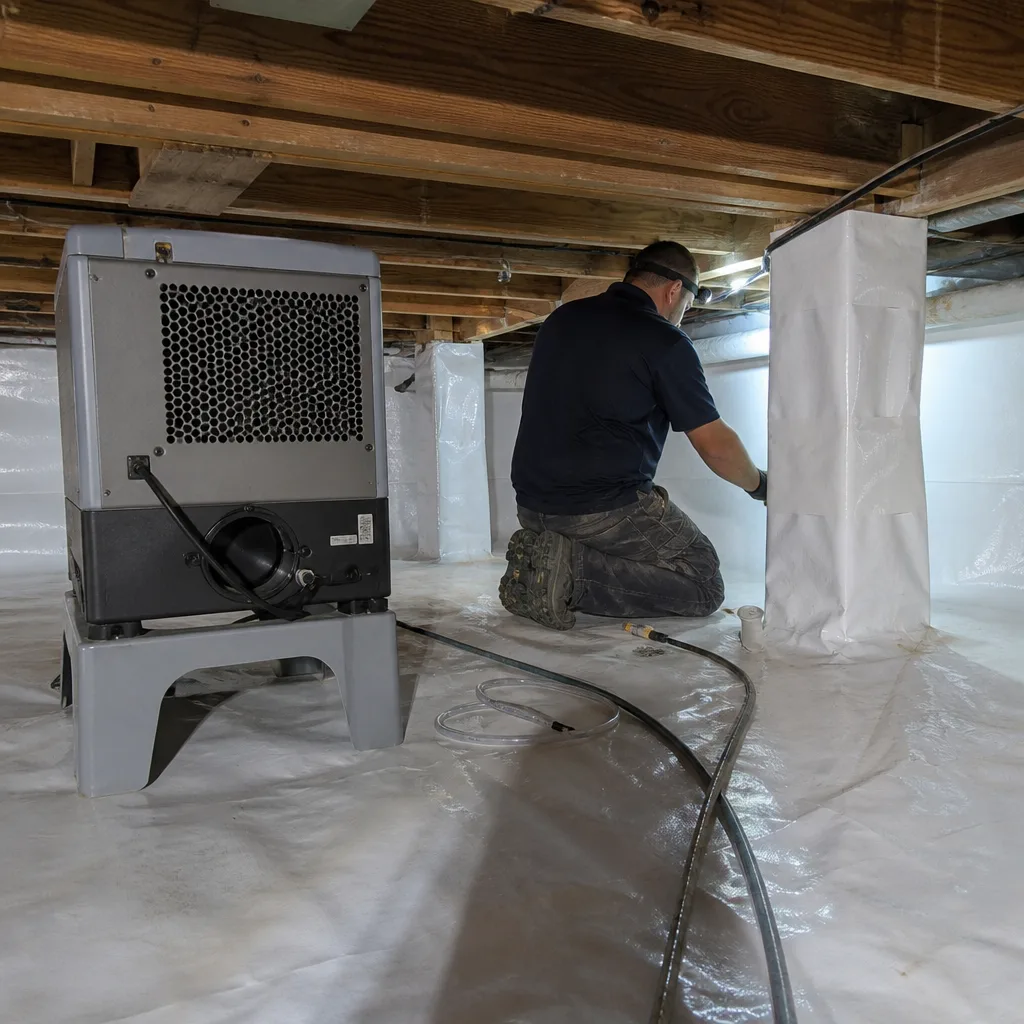
Call a professional when the crawl has visible wood damage, sustained moisture readings above 19% wood moisture content, or standing water that reappears after every monsoon season. Also call if you’re seeing condensation on ductwork or plumbing under the floor, or if you’re planning to sell within a couple of years and want the crawl documented for the inspection. Crawl spaces concentrate soil gas, and some homes in Henderson show elevated radon or soil-gas readings that warrant testing; that’s a reason to bring someone in, not to handle it yourself. Removing old liner, sealing foundation penetrations, and working around gas and electrical lines in a tight, low-clearance crawl carries real risk. Envelope Insulation Henderson offers free estimates in Henderson – call (844) 320-5338 and we’ll set up a time to look at the crawl, take the readings, and give you a written quote.
Frequently Asked Questions
Most Henderson encapsulation jobs run $6,500 to $14,000 for a typical single-family crawl, with the price driven by square footage, liner thickness, air sealing scope, and whether a dehumidifier is justified. Partial vapor-retarder work runs $2,000 to $4,500. Call (844) 320-5338 for a written quote specific to your crawl – the estimate is free.
You need one when post-install relative humidity in the crawl stays above 60%. Below 55%, it’s usually not required. The decision should be based on the measured reading after the liner and air sealing are done, not on a default package. Call (844) 320-5338 to schedule a crawl assessment – estimates are free.
You can lay 6-mil poly yourself, but it functions as a vapor retarder, not encapsulation. Unsealed edges, missed penetrations, and open foundation vents let vapor bypass the sheet entirely. Many Henderson homes we inspect have failing DIY poly installs from a few years ago. A sealed 20-mil liner with sealed wall terminations is a different system, and it’s the one that stops the moisture movement. Call (844) 320-5338 for a free estimate on a proper install.
Most standard crawls take one to two days for liner installation and air sealing, with a follow-up visit for post-install humidity readings. Larger crawls with significant wood repair or dehumidifier installation can run longer. The written scope should always name the expected duration and the follow-up date. Call (844) 320-5338 for a same-week estimate.
A properly sealed Henderson crawl space typically stabilizes between 45% and 55% relative humidity after encapsulation. Wood moisture content on joists and subfloor should read below 19%, which is the threshold where rot begins. Readings above 60% indicate the system has a gap somewhere. Call (844) 320-5338 if yours is running high – we’ll take the readings and tell you what we find.
Encapsulation fixes the moisture problem and reduces the crawl’s contribution to energy loss, but it doesn’t do the whole job alone. Air sealing at rim joists and penetrations and adequate insulation above the ceiling usually matter more for the bill. A home energy audit measures both and tells you where the biggest gains are. Call (844) 320-5338 to schedule an audit and a crawl assessment in one visit.
If you want to cross-check with our broader service line, our Envelope Insulation Henderson home page lists the full envelope work we do. And for the difference between crawl work and spray foam in tight spaces, see Spray Foam Insulation in Henderson.
The Bottom Line
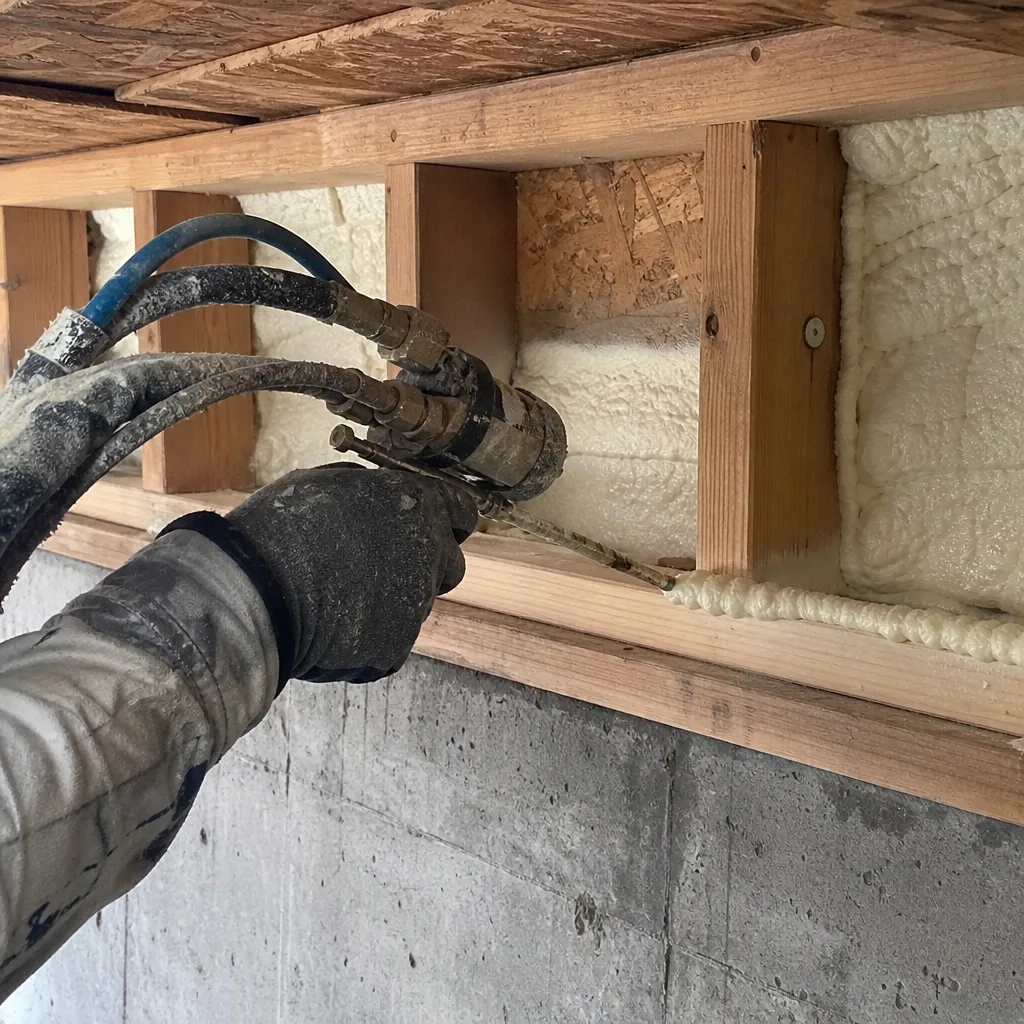
Henderson crawl spaces fail on vapor movement, not rainfall. The 4.2 inches of annual rain is a distraction; soil vapor pulled upward by the pressure differential is what pushes wood moisture content above the 19% rot threshold. The fix is a system: sealed vents, sealed rim joists, sealed penetrations, sealed wall terminations, and a true 20-mil liner – not a sheet of plastic over dirt. Add measured humidity and wood moisture readings before and after, a written spec sheet, and a written warranty before anyone starts. That documentation is the difference between an encapsulated crawl and a promise. Every job through Envelope Insulation Henderson starts with a written price and ends with a documented record under The Haven Standard.
Talk to Us About Your Henderson Crawl Space
If you’re seeing musty air, cupped floors, or condensation on the ductwork, the crawl is the place to look first. We’ll come out, take the moisture readings, tell you what we find, and hand you a written price before any work starts – with a documented photo record and the 365-Day Done Right Promise when the job is done. Call (844) 320-5338 for a free estimate. Live person answers, no voicemail loops, and we’ll bring the readings to you.
Written by the team at Envelope Insulation Henderson.